# Snippets
# Styles
To get the build-in styles and set all the snippets in the fastest way, include in your html header this snippet:
<?php snippet('kirby-pay.styles') ?>
# Payments
To perform a payment you have two snippet options: payment and order. The payment snippet has the ability to create an order and a charge payment process.
The order snippet requires to have a customer before to perform the payment.
# Payment
The default method process for payments is charge but if you need to create a payment with an order method process, just update your Kirby configuration file config.php with the proper option:
return [
    'beebmx.kirby-pay.payment_process' => 'order',
];
When you set your preferred method process, you can add the snippet to create payments:
<?php
  snippet('kirby-pay.payment', [
    'items' => [
      ['name' => 'Product 001', 'amount' => 300.00, 'quantity' => 1],
      ['name' => 'Product 002', 'amount' => 50.00, 'quantity' => 2],
    ]
  ]);
?>
TIP
You can add an id to the items array to show in the panel view.
The id can be any string like $page->id(), $page->uid(), $page->slug() or anything related with the product or service.
Sometimes you already have some customer information captured in other forms. If this is the case, you can prefill these fields as shown below:
<?php
  snippet('kirby-pay.payment', [
    'items' => [
      ['name' => 'Product 001', 'amount' => 300.00, 'quantity' => 1, 'id' => '00001'],
      ['name' => 'Product 002', 'amount' => 50.00, 'quantity' => 2, 'id' => '00002'],
    ],
    'customer' => [
      'name' => 'John Doe',
      'email' => 'john@doe.com',
      'phone' => '1122334455',
    ],
    'shipping' => [
      'address' => 'Know address 123',
      'state' => 'State',
      'city' => 'City',
      'postal_code' => '12345',
    ],
    'card' => [
      'name' => 'John Doe',
      'number' => '4242424242424242',
      'month' => '12',
      'year' => '23',
      'cvc' => '123',
    ],
    'extra_amounts' => [
      'shipping' => 100.00
    ]
  ]);
?>
WARNING
You need to set at least the items array to use the payment snippet.
# Order
When you already have a customer registered in platform, create an order is your best choice to implement the payment process and to give your users a better experience.
<?php
  snippet('kirby-pay.order', [
    'uuid' => $customer->uuid,
    'items' => [
      ['name' => 'Product 001', 'amount' => 300.00, 'quantity' => 1],
      ['name' => 'Product 002', 'amount' => 50.00, 'quantity' => 2],
    ]
  ]);
?>
As in the payment snippet, you can prefill some fields:
<?php
  snippet('kirby-pay.order', [
    'uuid' => $customer->uuid,
    'items' => [
      ['name' => 'Product 001', 'amount' => 300.00, 'quantity' => 1, 'id' => '00001'],
      ['name' => 'Product 002', 'amount' => 50.00, 'quantity' => 2, 'id' => '00002'],
    ],
    'shipping' => [
      'address' => 'Know address 123',
      'state' => 'State',
      'city' => 'City',
      'postal_code' => '12345',
    ],
     'extra_amounts' => [
       'shipping' => 100.00
     ]
  ])
?>
WARNING
For the order snippet to work, you need to at least provide the uuid string and the items array.
# Customer
Kirby Pay also has some snippets to manage your customer data: create, update and source.
# Create
If you need to create users before making any payment and you are planning to use the order snippet, this is the way to do it:
<?php
    snippet('kirby-pay.customer');
?>
Or, if you need to prefill the fields:
<?php
    snippet('kirby-pay.customer', [
      'customer' => [
        'name' => 'John Doe',
        'email' => 'john@doe.com',
        'phone' => '3311223344',
      ],
      'card' => [
        'name' => 'John Doe',
        'number' => '4242424242424242',
        'month' => '12',
        'year' => '23',
        'cvc' => '123',
      ]
    ]);
?>
# Update
Once you have a customer registered in the platform, you can update their basic data:
<?php
    snippet('kirby-pay.customer.update', [
      'uuid' => $customer->uuid
    ]);
?>
If you need to prefill the fields, you can do it with:
<?php
    snippet('kirby-pay.customer.update', [
      'uuid' => $customer->uuid,
      'customer' => [
        'name' => $customer->customer['name'],
        'email' => $customer->customer['email'],
        'phone' => $customer->customer['phone'],
      ]
    ]);
?>
WARNING
You need to have at least the uuid string to use the update snippet.
# Update payment source
You can also update the payment source of a registered customer using the following snippet:
<?php
    snippet('kirby-pay.customer.source', [
      'uuid' => $customer->uuid
    ]);
?>
To prefill the fields:
<?php
    snippet('kirby-pay.customer.source', [
      'uuid' => $customer->uuid,
      'card' => [
        'name' => 'John Doe',
        'number' => '5555555555554444',
        'month' => '12',
        'year' => '23',
        'cvc' => '123',
      ]
    ]);
?>
WARNING
You need to have at least the uuid string to use the source snippet.
# Get customer
There are some snippets that require the customer information, It's recommended to get this data in a controller:
<?php

use Beebmx\KirbyPay\Customer;

return function ($page, $site, $kirby)
{
    //Get customer uuid then

    $customer = Customer::find($uuid);

    return compact('customer');
};
# Oxxo Pay
To use Oxxo Pay you need first to set the conekta driver and enable oxxo_cash in payment_types array in your Kirby configuration file config.php:
return [
    'beebmx.kirby-pay.service' => 'conekta',
    'beebmx.kirby-pay.payment_types' => ['card', 'oxxo_cash'],
];
When a payment has been performed as Oxxo Pay, you can use the snippet for that purpose:
<?php snippet('kirby-pay.oxxo', ['payment' => $payment]) ?>
Before you call the Oxxo Pay snippet it's important to get the payment:
<?php

use Beebmx\KirbyPay\Payment;

return function ($page, $site, $kirby) {
    //Get payment with the params

    $payment = Payment::find(param('id'));

    return compact('payment');
};
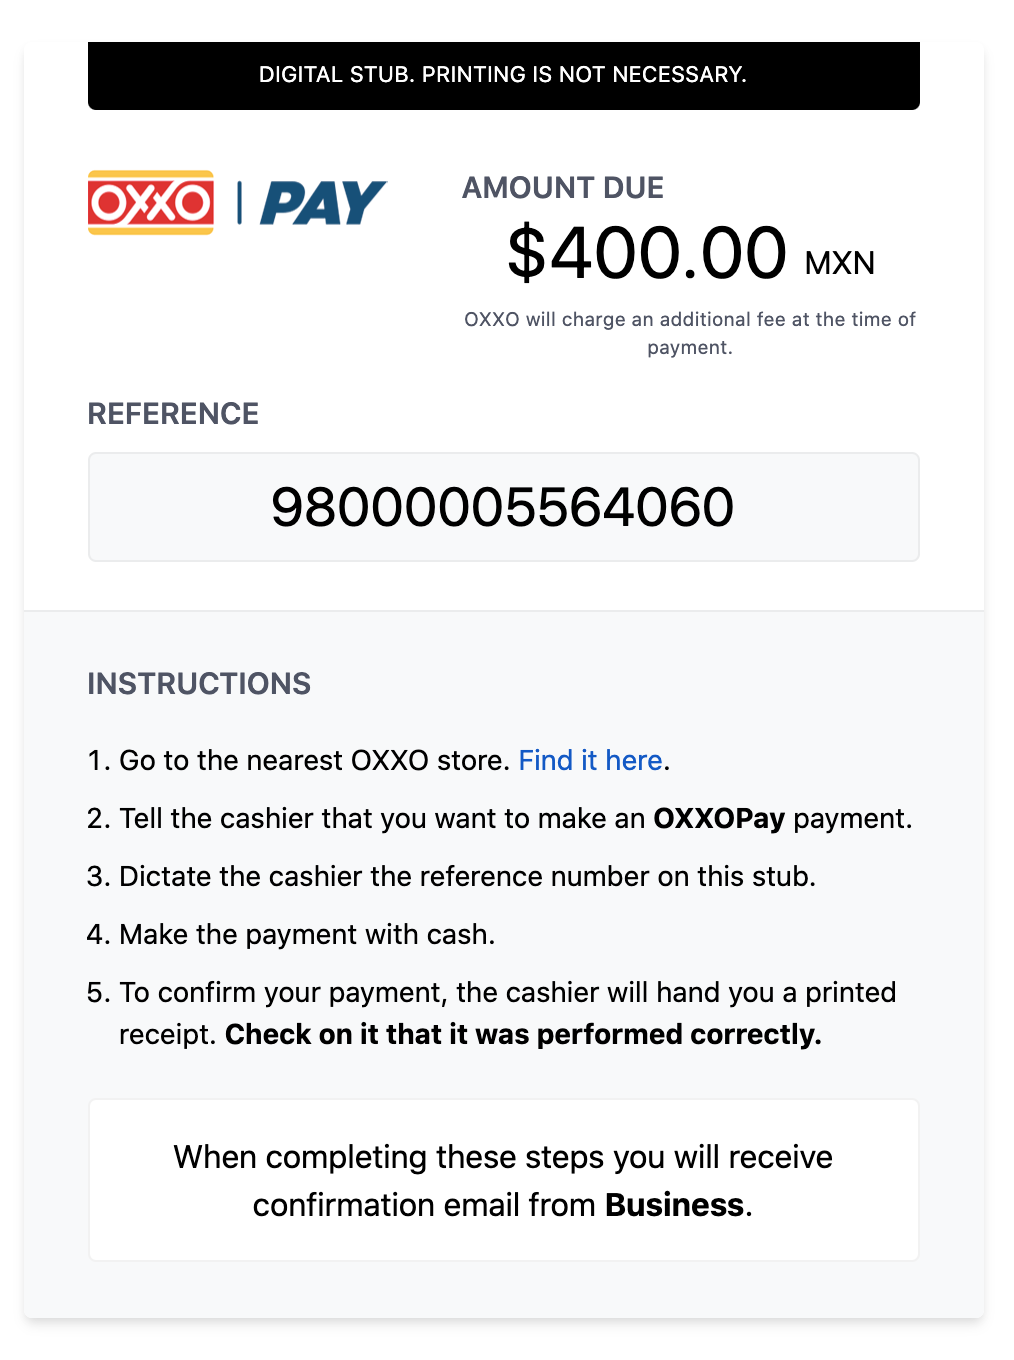
The result will be the Oxxo payment order. It contains the amount to be paid, the reference and the instructions to make the payment. Looks like this:
TIP
It's a good practice to obtain the payment in a controller.
If you need to update the Business text displayed in the snippet you can do it with:
return [
    'beebmx.kirby-pay.name' => 'Shop business',
];
# Redirections
By default, Kirby Pay redirect every snippet to a specific URL. The purpose of this is that you will be able to create feedback for the end user. The default values for the redirections are:
//Defaults values

return [
    'beebmx.kirby-pay.redirect' => 'thanks',
    'beebmx.kirby-pay.redirect_customer_create' => 'customer',
    'beebmx.kirby-pay.redirect_customer_update' => 'profile',
    'beebmx.kirby-pay.redirect_source_update' => 'profile',
];
Of course, you can change this URLs with your own flow:
return [
    'beebmx.kirby-pay.redirect' => 'purchase',
    'beebmx.kirby-pay.redirect_customer_create' => 'welcome',
    'beebmx.kirby-pay.redirect_customer_update' => 'user/profile',
    'beebmx.kirby-pay.redirect_source_update' => 'user/profile',
];
# Parameters
When a redirect is done, it will come with some parameter to help you to handle the action performed.
For any snippet payment (payment and order), you will receive a payment id:
https://[your-site-url]/thanks/id:1ee9aa1b-6510-4105-92b9-7171bb2f3089
For the customer snippet, you will receive a customer id:
https://[your-site-url]/customer/id:1ee9aa1b-6510-4105-92b9-7171bb2f3089
For customer update snippet and payment source update, you will receive an action:
    https://[your-site-url]/profile/action:customer-update
    https://[your-site-url]/profile/action:source-update
# CSRF Token
All the request created by the snippets needs to validate that the request is coming from the same server. Therefore, all the petitions should have a csrf-token. To add the token just include it in the header meta:
<meta name="csrf-token" content="<?= csrf() ?>">
WARNING
If you don't include the csrf-token, you will get an error from the server.
← Installation Options →